
A Workflow is a predefined set of rules for processing data submitted through an eForm. Workflows can define the following:
- What the submitter sees upon submission of a form.
- The action options a set of recipients has when a form is submitted.
- What the submitter sees in response to an action invoked by a recipient.
The workflow system uses HospitalPortal.net’s reminder and task subsystems to generate predefined reminder and task messages as the result of user actions. The following is guide to the difference between a Reminder and a Task.
Reminders: Appears on a page hosting the Reminder’s component. Lists and provides a link to an open actionable item that can be by taking action within the HospitalPortal.net® system.
Tasks: A Task Item that appears on a page hosting the Task component. This Task Item has a set of structured fields (subject, description, due date, etc.) and also a state of either open or completed. The portal provides a page to see and administrative all of a user’s tasks.
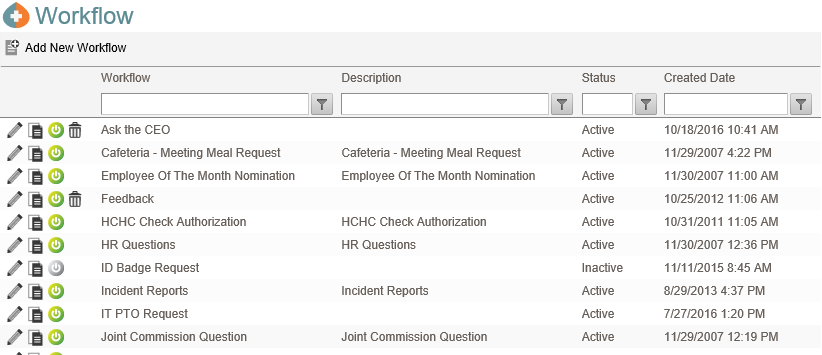
Workflows – Clicking this link in the Administrator’s Vertical Menu brings up the management page shown in the screenshot that lists all the Workflows in the portal. Workflows that were created with the built-in Workflow Builder can be viewed and edited here. Custom Workflows created via the development kit can only be Activated, Deactivated or Deleted here.
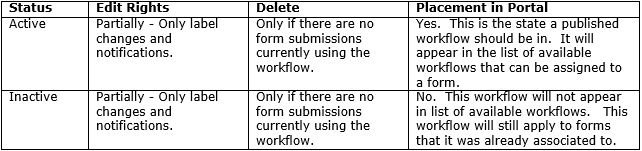
The Status of a Workflow is a key element of the Workflow Builder system and determines many of the available actions within the component. The following table summarizes the behavior of Workflows with each status.
Only Workflows created with the Workflow Builder are editable from this page.
Workflow Name Hyperlink – Each workflow name is a hyperlink that opens a workflow in the Workflow Builder so that it can be modified.
 – Shows the Workflow is Active and is available for assignment to a form. Clicking on the icon will deactivate the Workflow
 – Shows the Workflow has been Deactivated and is not available for assignment to a form. Clicking on the icon will activate the Workflow
 – Deletes a workflow from the system and is only available for workflows that do not have an open form using it.
 – button on the grid toolbar – This button invokes the HospitalPortal.net® Workflow Builder.
Step 1 – Create a New Workflow
You will start off creating a Workflow by first naming the workflow, then defining the first step in the workflow.
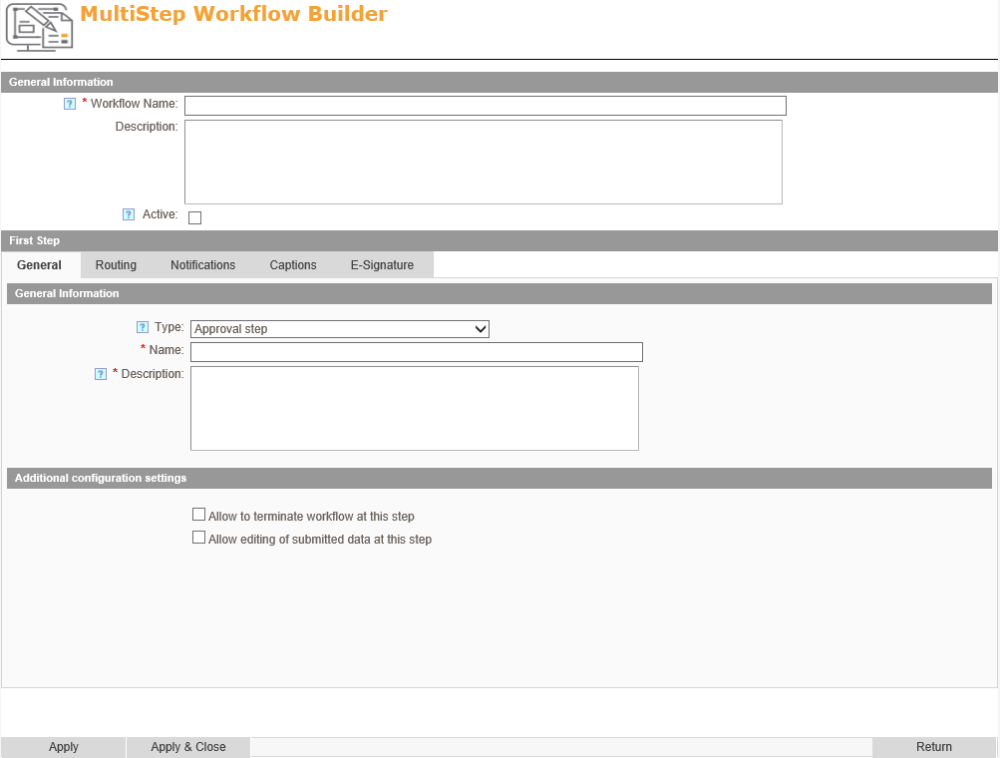
Work Flow Name: A unique name used within the component.
Description: Describe what the workflow does and is used for.
Active checkbox – If checked the workflow is active and can be used to route active forms on the intranet.
Step 2- Enter parameters for the first step in the workflow
General Tab
Type:
- Approval Step – Form will require approval by form recipients
- Processing Step – Form recipients will acknowledge that they processed the form
- End of Workflow Notification to Submitter – lets submitters know that the form made it through the workflow.
Name – Name of the first step of the workflow
Routing Tab
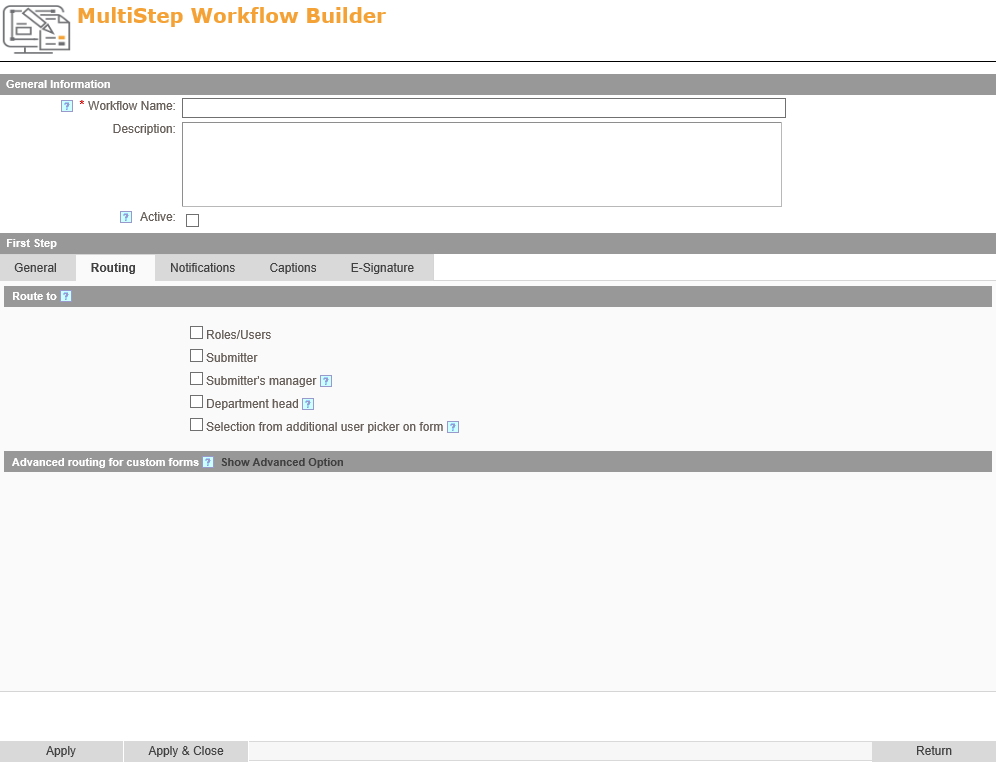
You will presented with a series of checkboxes to choose where the form gets routed.
- Roles/Users – If selected, two list selectors will appear where you can choose individual users, security roles, or both.
- Submitter – The form will get routed back to the submitter to complete the workflow step
- Submitter’s Manager – Will go to the manager of the submitter if selected in the user’s account. If no manager is specified, a user picker would show on the form at the time of submission.
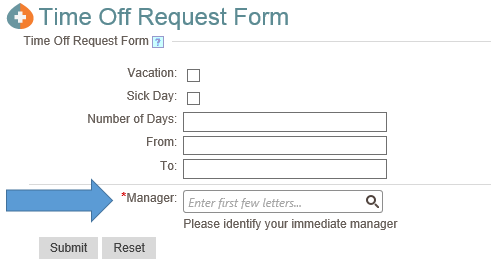
- Selection from additional user picker on form – this will allow the submitter to choose who receives the form submission as seen below. You have options to
- Add the user picker to the form for initial submission
- Add the user picker to the form on the previous step
- Define a caption for the user picker (required)
- Define additional description of the field that will display on the form
You will also have the options for recipients to:
- Allow to terminate workflow at this step.
- Allow for editing of submitted data at this step.
Notifications
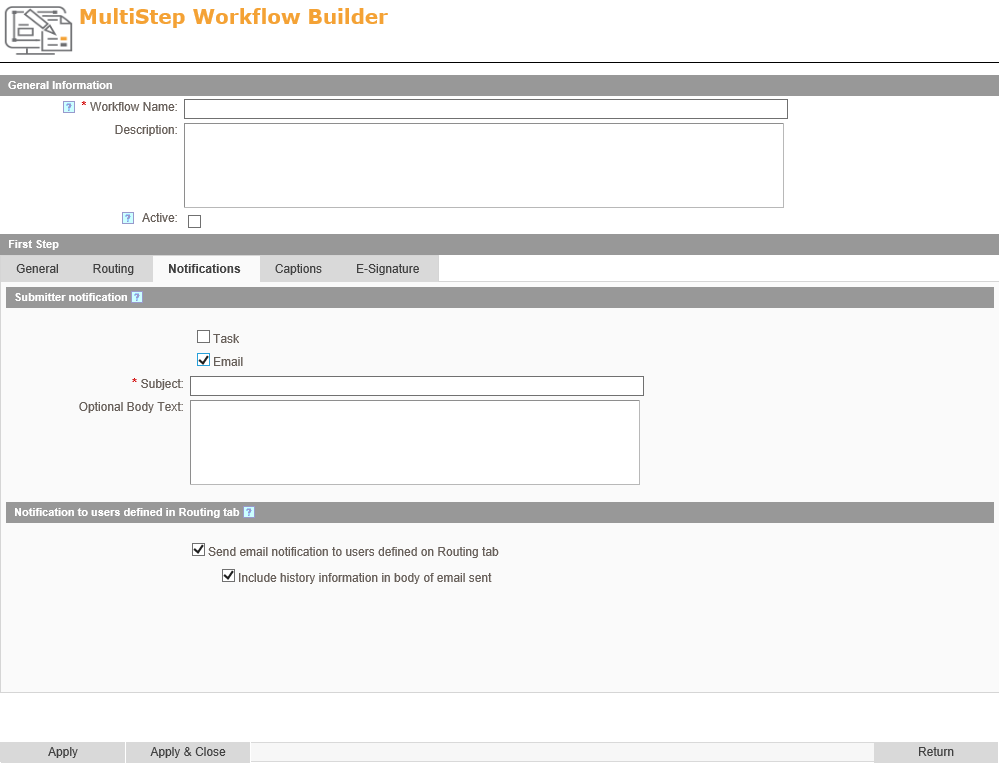
Under Submitter notifications you’ll see two checkboxes to choose to send the form recipient a task for the Task Management component or send an email. If either is checked a text box for the subject line for the task/email and the optional body text of the task/email will appear.
Under the Notification to users defined in Routing tab you have the option to Send email notification to users defined on Routing tab and Include history information in body of email sent.
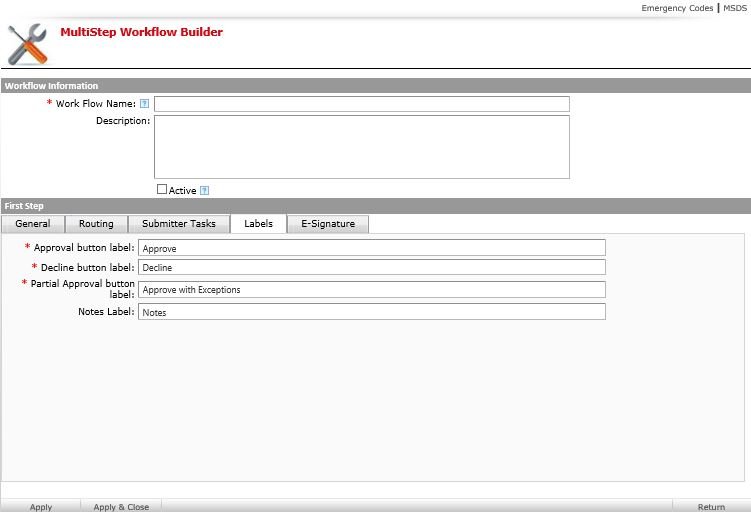
Labels
Under the Labels tab you can decide what the action buttons will be named when the recipient needs to act on a form. For example, the default button for approving the form shows “Approve”. However, you can change this button to show as “Accept” if that is more relevant to the form.
Step 3- Save the Workflow

[Apply] – Saves a new workflow or modifications to an existing workflow.
[Apply & Close] – Saves a new workflow or modifications or modifications to an existing workflow and directs user to the previous page.
[Return] – Does not save changes and returns user to workflow list.
Editing an Existing Workflow (adding more steps)
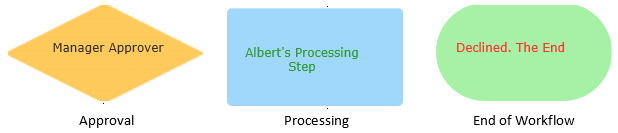
Workflow Name Hyperlink also invokes the HospitalPortal.net® Workflow Builder as seen below. It will show the workflow in a diagram format with different shapes representing different kinds of workflow steps.

Each step in the workflow will be represented by a shaded shape. Each shape represents a different type of workflow step (Approve or Decline, Processing step, or End of Workflow).
You can add new steps by clicking on the action buttons that appear when you hover over the parent step. On Approval workflow steps you will get a thumbs up  and a thumbs down icon
  . Click on either of them to create a step that the form will go to after the recipient approves or declines the form.
Processing steps will have a new icon if you need another step after the recipient processes the form.
Post your comment on this topic.