
Creating a New Notice
In order to create a notice that audience members will have to acknowledge that they read, you have to be a Category Moderator for at least one category. To create a new notice:
- Click the New (
![]() ) icon in the component’s title bar. The Notice Details will appear.
) icon in the component’s title bar. The Notice Details will appear.
![]()
- Leave the Publish on apply as checked if you want to publish your notice immediately. Uncheck the check box if you do not want to publish the notice after saving.
- In the General Information section, select the category to which you want to add the new notice.
- Then give it a Title.
- The Require scroll to bottom checkbox will require Audience members to scroll to the bottom of the notice text before they can indicate that they’ve read the message.
- In the Notice Content section, add the Description or body of the notice.
- Select one or more of the below checkboxes to add additional content.
- Include Video – Allows for uploading video files to be embedded with the notice. Once checked, several options will be available to specify.
- Choose to Upload a brand new video or Select from a Library of videos uploaded by others
- If choosing a new video, you may Upload the Video and define a Title and Description.
- Under Player settings, you may choose the width and height of the video in % of the Notice window. Also included in this section is to select to show Toolbar Docked, Full Screen Button, and Enable Muting.
- Under the Privacy section, you have the following options:
- Video Re-Usability
- None – This video cannot be re-used by others. This setting will make it impossible for other content editors to use this same video on their pages
- Open – This video can be re-used by others (i.e. embedded in other events, notice acceptance requests, etc.)
- Link to Video – By checking this checkbox, others can view this video just by using the URL that appears after checking the checkbox.
- Viewing Rights
- Anyone can play this video
- Authenticated can only play this video
- Only specific users or roles can play this video – selecting this option, list pickers will be displayed where you can choose what roles/users will be able to view the video wherever it is published.
- Video Re-Usability
- Include Link to Page – Start typing the name of the page you want to link to in the Page field. Select it when it shows under the field. The Caption is the text that will appear for the Audience member to click on to access the page.
- Include Link – Type in the URL for the website you want to link to. Add a Caption that people will click on to access the website.
- Attachments – Click on Upload to attach a file that supports the notice.
- Include Video – Allows for uploading video files to be embedded with the notice. Once checked, several options will be available to specify.
- Under the Notice Dates section determine the key dates for the notice
- Future Display date – Select this checkbox if the notice needs to be displayed at a later date
- Display End Date – Determines when the notice will no longer be visible to audience
- Due Date – The date that the Audience Members are expected to read the notice
- Under the Audience section, select either individual users, roles, or committees to receive the notice.
 ) icon in the component’s title bar. The Notice Details will appear.
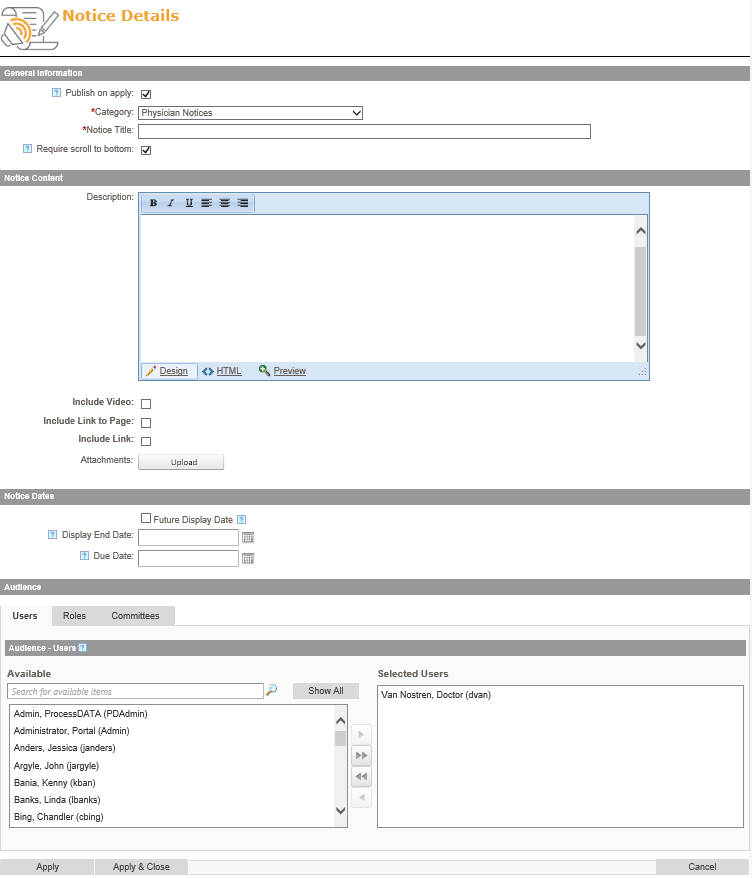
Accepting a Notice
To accept a notice:
- Login. You will have to be assigned as an Audience Member for the notice.
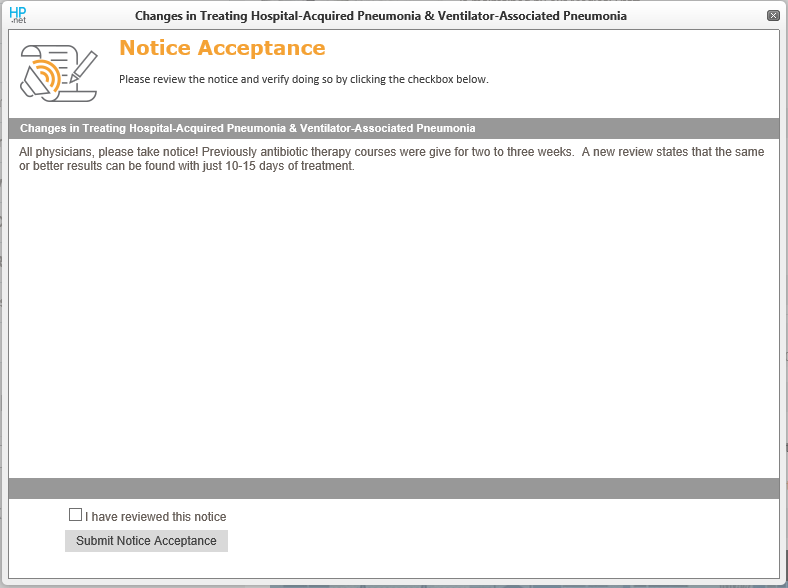
- Go to the Notice Acceptance Component. You will see the title of the notices that were assigned to you.
![]()
- Click on the title of a notice. This will display a popup with the notice details
- Read the notice and check the checkbox for I have reviewed this notice
- Click on the Submit Notice Acceptance button at the bottom of the popup

Last modified:
Jul 10, 2023
Post your comment on this topic.